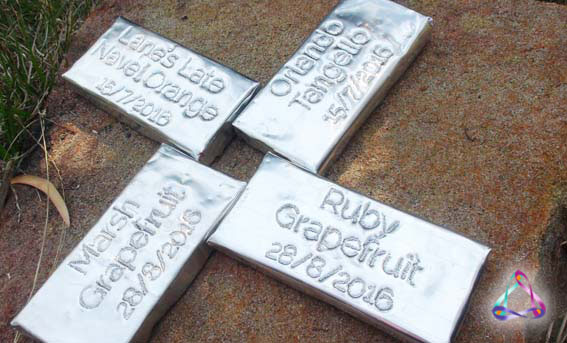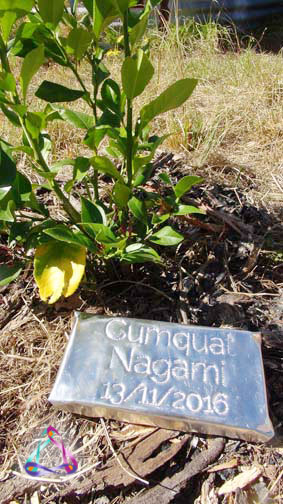
Many avid gardeners and horticulturists know how important it is to keep track of the various specimens in their garden. The name of the tree or plant and sometimes the date it was planted are both important pieces of information for reference.
But you don’t have to be a keen gardener to make use of these labels. They can be used to mark or label anything – inside or outside of the house.
Outdoor signs and labels must be tough, and withstand all types of weather conditions.
They should be:
- long lasting, and so tough that they last decades
- durable – withstand the outdoors
- clear and easily legible
- fairly inexpensive to make, if on a budget
- easy and quick to make
I went through a few trial and errors before I found this excellent solution.
Initially I tried a concrete and sand mix in a mould. When it was still wet, I engraved it with a pointy tool. They came out okay, but I was not entirely happy with them. They were easily broken and I had to engrave with care, otherwise problems arose. A letter out of place or running out of room were common problems with this method. I rethought it and the first idea that came to mind was stainless steel plates. Stainless can be costly and can eventually rust if of a lower grade, so that idea was out.
Aha… I thought – what about aluminium? We bought some aluminium flashing from the hardware store for various projects around the house, so it got me thinking… The material is perfect for the garden – it is durable, withstands the outdoors and is fairly inexpensive, too. A 20m roll of ‘Weatherflash’ can be bought from our local hardware store and costs around AU $26.
It can be difficult to engrave aluminium by hand, but not if you use a hammer and a pointy and sharp object like a concrete nail. Then all you need to do is print out your label on a printer and hammer away. A heavy block of timber is perfect to wrap the aluminium around, because the weight will ensure the label doesn’t fly away in the wind.
Here is how I put them together step by step.
What you’ll need:
- A roll of aluminium flashing called ‘Weathershield’ – 15cm wide, 0.3mm thick (both came as standard) x 25cm long (cut to size)
- A block of timber (or anything else that has weight) that is approx. 10cm wide x 20cm long x 2.5cm thick
- Tin snips or heavy-duty scissors
- A hammer
- A concrete nail
- A printer and pc with Photoshop or Word
- Sticky or masking tape
- Old piece of mdf or chopping board to protect the furniture
- Elastic bands
Instructions
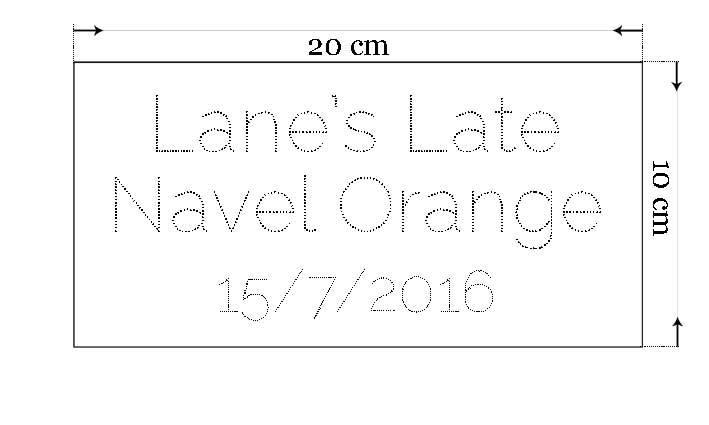
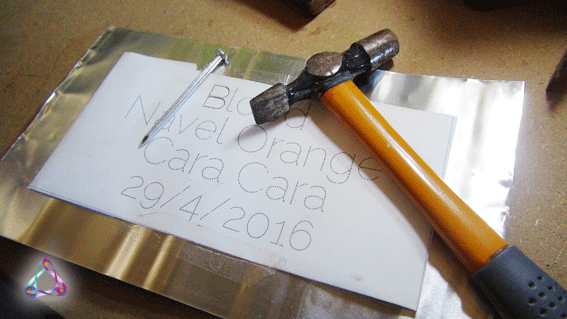
1. On your computer, draw a box template 10cm x 20cm within an A4 frame. Or you could create a document that is a custom size of 10cm x 20cm, and mark a border around it so you’ll know where to cut the printout. Inside of this border is where your text will be contained. I used the free font called ‘Raleway Dots’. It’s a free font that can be installed on your computer easily. I found that after a little while, once I got the hang of it, I didn’t need to follow the dots from the font. If you get good at it and can space the gaps by eye, you can really use any font you like. Here is my sample:
You will need to overlay your chosen font over the top of the template
2. If you haven’t cut the piece from the roll yet, measure and mark out 25cm of aluminium sheet and using tin snips, cut the length off in a straight line away from the roll. Be careful when handling aluminium, it’s pretty sharp.
3. Print out the template, cut it out of the border and paste it in the centre of your aluminium sheet. You can be more precise by measuring the top, bottom, left side and right side of the aluminium sheeting with the printout. Every side should measure 2.5 cm from the edge of the aluminium sheet to the edges of the printout.
3. Stick your printout in its centre position with masking tape on top and bottom.
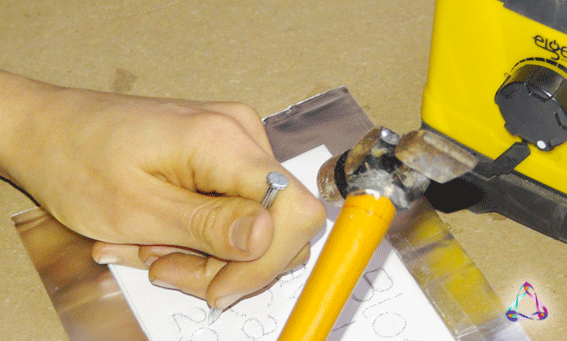
4. Use an old piece of mdf or an old chopping board – anything you don’t care to mark so you won’t damage the furniture. Place your sign on top and let the marking begin…
5. Follow the dots. The more you get the hang of it, the faster you’ll finish it. One sign took me about ½ hour but it really depends on how many letters you have to mark. You can see your progress when you flip over the sign.
6. When you’re done, peel off the printout and…voila! Now flip the sign upside down and place your block of timber in the centre. Then bend the side panels upward so they ‘hug’ the block of timber.
7. All that remains now is to fold the narrowest sides. Just like you would wrap a gift, bend two corner tabs inward so they look like this:

The timber will want to move as you do this – if it helps, try elastic bands to keep it in position so it doesn’t move as you’re folding it.
Now bend the final tabs inward so they ‘hug’ the timber. These tabs are the trickiest because of the fold over the corner tabs.
8. You’re done! Enjoy your garden signs.